Friday, August 28, 2009

Sweet potato

This is the 3rd submission for the Merdeka Open House 2009 held by Babe in the City -KL.

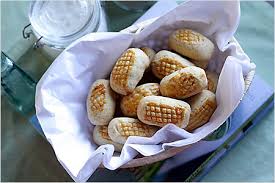
I like the simplicity and versatility of sweet potatoes. Especially when it comes to making easy but yummy desserts. To prove my point on sweet potatoes' versatility, I'm posting 2 recipes that uses sweet potatoes. :D

I did not measure the ingredients so I'm writing this based on guess-timation so I apologize if the taste doesn't seem too good but you can always adjust the ingredients to suit your taste buds.

It was my housemate that got me hooked onto the sweet potato sweet drink or 'Farn Shee Tong Sui'. She said that her mom used to make it very often at home and it gave her very fond memories. Now she passed on this liking of this dessert to me. :P I like the strong ginger taste hence I added more ginger for the flavour.


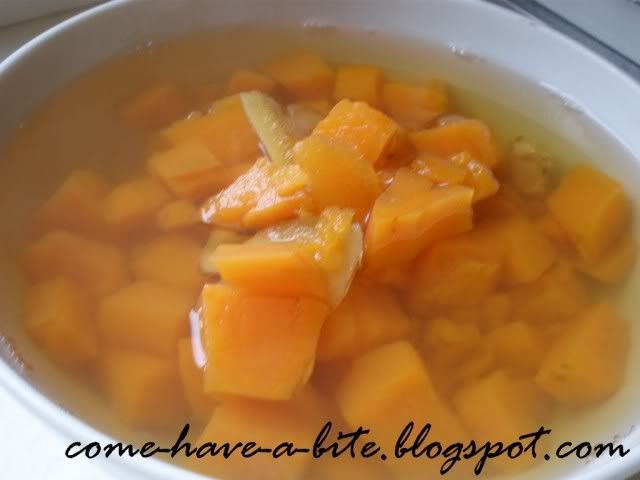
Sweet Potato Sweet Drink (Farn Shee Tong Sui)

Ingredients: (Serves 1)
  • 250g sweet potato, diced
  • 2 cups of water
  • 2 inch knob of ginger, crushed or sliced
  • Rock sugar, to taste
Method:
  1. Bring the water to a boil in a pot and add the ingredients.
  2. Simmer for 15 minutes or until the sweet potatoes are tender.
  3. Serve warm or chilled.
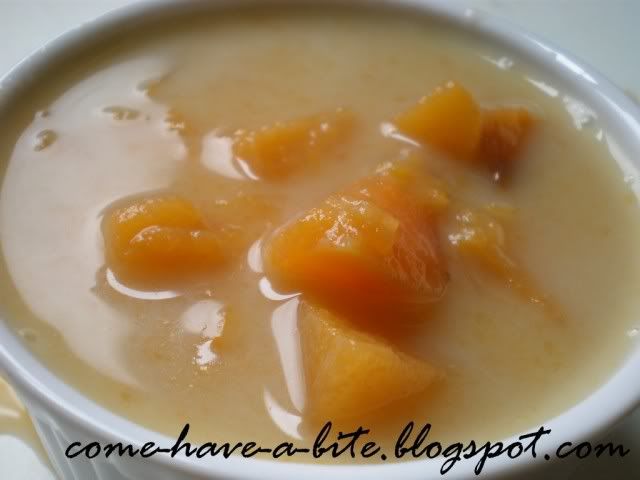
The next one in line is Bubur Cha Cha. I didn't have yam or tapioca on hand so I made my bubur cha cha purely out of sweet potatoes. It still managed to satisfy my craving nonetheless. :)


Bubur Cha Cha

Ingredients:
(Serves 1)
  • 250g sweet potato, diced
  • 2 cups of water
  • 100mL coconut cream
Method:
  1. Bring the water to a boil in a pot and add in the sweet potato.
  2. Stir in the coconut cream and simmer for 15 minutes or until the sweet potatoes are tender.
  3. Serve warm.
Feel free to add in some diced yam or tapioca pearls to further enhance the appearance and taste of this dessert. Hmm... Now I'm craving for another bowl. :P

Tuesday, August 25, 2009

Kuih Bakar

This is the 2nd submission for the Merdeka Open House 2009 held by Babe in the City -KL.

If there's a size that I love, it's got to be anything mini. Mini cheesecakes, mini cupcakes, mini tarts... You get the gist. I'd like to believe the guilt and sin comes in mini size as well. :P So I've decided to whip up my own mini 'Kuih Bakar' otherwise known as 'Kuih Kemboja'


It wasn't very easy but I just made one mini kuih to feed my sweet tooth craving. This tastes just like eating a cripsy kuih with kaya filling minus the egg.


I didn't follow a recipe and just went with my gut feeling for this one. Easy peasy. Here goes:

Ingredients:(Makes 1)
  • 50mL coconut milk
  • 15mL of water
  • 1/8 cup flour
  • 1/4 tbsp butter
  • 1/8 tsp sugar
  • pinch of salt
  • a drop of pandan paste
  • 15mL of water
  • Sesame seeds, to sprinkle
Method:
  1. Preheat oven to 175°C. Mix all the ingredients together in a small bowl until well combined.
  2. Pour the batter into a cupcake mould until almost full.
  3. Sprinkle some sesame seeds on top.
  4. Bake in the oven for 50-60 minutes or until a skewer comes out clean when poked in the middle.


What it looks like in the centre. It is slightly under baked because I didn't want to poke it for photography purposes and I was too hungry to wait any longer. :P

Saturday, August 22, 2009

Pineapple tarts

Pineapple tarts are definitely one of my favourite Chinese New Year cookies. So, I've finally tried one on my own but I've actually added the wrong amount of ingredients. *slaps forehead*


Anyhow, here's the proper recipe:

Recipe adapted from Rasa Malaysia.

Ingredients: (Makes 12 tarts)

i) Pastry
  • 5/8 cup of all purpose flour
  • 1/4 cup of butter, softened
  • pinch of salt
  • 1 egg yolk
  • 1 tbsp icing sugar
  • 1/2 tbsp cornstarch
  • 1 egg white (for egg wash)
ii) Pineapple filling
  • 1 can (440g) of sliced pineapples
  • 4 tbsp sugar
  • 1/2 tsp cornstarch mixed with 1/2 tsp water
Method:

1. Drain the pineapple slices and squeeze the extra juice with your hands then blend them for 10 seconds in a mini food processor.
2. Cook the drained crushed pineapple and sugar on medium heat until most liquid has evaporated and filling turned golden. Stir constantly to avoiding burning.
3. Add cornstarch to thicken mixture. Set aside and let it cool in fridge.
4. Preheat the oven to 175°C and cream the butter with a mixer until it is light and fluffy. Add in egg yolk until well combined.
5. Sift in the flour, corn flour, salt and sugar into the butter mixture. Stir until just combined.
6. Divide pastry dough and pineapple filling into 12 equal rounds. Wrap/place the pineapple filling in/on the pastry with whichever method you prefer. Here are a few examples:


The amount of pastry listed in the recipe is calculated for the shortbread style (Pic 3). Doing it other styles would usually result in excess pastry. I did mine the Nyonya style (Pic 4).

7. Use a fork to make patterns on the tart and brush it with egg wash. Bake for 20-25 minutes or until light brown.

Enjoy! Here are some photos of the process.


Preparing the pineapple filling.


Creaming the butter.


Rubbing in the flour.


Before putting into oven


Final product.

I know mine looks pathetic. These are skills I definitely need to improve on. Especially when I might be making them again in the future. :)

Wednesday, August 19, 2009

Ban Jian Kuih / Apam Balik

I've always loved visiting pasar malam or literally translated as night market with my sister to get our hands on all the yummy snacks and delights.

I finally had the opportunity to try making one of the snacks popularly sold.


Recipe obtained from Lily Ng.

Ingredients: (Makes about 6-10 depending on thickness)
  • 1 egg
  • 225 ml water
  • 1 1/3 cup all purpose flour
  • 2 tbsp sugar
  • 1 tbsp milk powder
  • 1/2 tsp salt
  • 2 tbsp canola oil
  • 1/2 tsp baking soda
Method:
  1. Whisk the eggs, pour the water and keep stirring until it bubbles.
  2. Fold in flour, sugar, milk powder and salt until the ingredients are combined. Then stir in canola oil. Leave to rest for 30 minutes.
  3. Heat fry pan on medium heat. Add in baking soda and whisk well to combine.
  4. Pour batter into fry pan which has already been warmed. Pour less batter if you want it to be thin and crispy. (I made mine soft and chewy)
  5. Using the base of the ladle to swirl the batter in a circular motion so that the sides of fry pan has a thin coating of batter which will be crispy when it is done.
  6. Cover the fry-pan with a fitting lid. Cook it until the surface has pores. Melt some butter on the ban jian kuih and dust it with sugar, crushed peanuts and sesame seeds.
  7. Cover the pan again until well done. Fold it into half and serve onto plate.
*Alternatively, you can use buttery sweet creamed corn as filling.


The key is to be VERY generous with your filling. From the picture you can tell I was being extremely stingy.


Extra, extra melted butter please! :D Oh, and I can imagine how yummy it would taste with buttery sweet creamed corn too.

Monday, August 17, 2009

Snickerdoodles

I have never heard of snickerdoodles until recently. After all, they do not look like Snickers, neither do they look like any form of doodle.

Looking at the recipe, the steps are simple and I'm sure like everyone else, the ingredients are readily available in your pantry.


Recipe adapted from The Big Book of Baking.

Ingredients: (Makes 10)
  • 55g butter, softened
  • 35g sugar
  • 1 small egg
  • 1/4 tsp vanilla extract
  • 100g plain flour
  • 1/4 tsp bicarbonate of soda
  • pinch of salt
  • 1/4 tbsp sugar
  • 1/2 tbsp ground cinnamon
Method:
  1. Preheat oven to 190°C and line a baking tray with paper and chill it in the fridge.
  2. Cream the butter and sugar together until fluffy. Sift the flour, bicarbonate of soda and salt into the mixture.
  3. Slowly beat in the egg and add in the vanilla until just combined.
  4. Wrap the dough in a clingwrap and chill in the refrigerator for 30 minutes or more.
  5. In the meantime, mix together the sugar and cinnamon in a small bowl.
  6. When the dough is ready, divide the dough into 10 and roll them into balls.
  7. Roll each ball in the cinnamon mixture to coat and place on prepared baking trays, spaced well apart.
  8. Bake in the preheated oven for 10-12 minutes, until it is slightly firm to the touch. Do not overbake.
  9. Leave to cool on baking tray for 5-10 minutes, then transfer to wire racks to cool completely.
Be sure to check the oven often as snickerdoodles are meant to be chewy, not hard which can result from overbaking.

This recipe should result in a crisp, firm edge with a soft, light filling in the centre. For me it felt like I was munching on a cookie on the outside and eating soft cinnamon doughnut on the inside.

Best of both worlds! :D

Saturday, August 15, 2009

Shortbread


I'm sure many of you grew up munching on these delicious butter cookies that we all know as 'butter cookies in the blue tin' simply because Kjeldsens Danish butter cookies sounds too complicated.

Now you can make your very own butter cookies or shortbread right at home.


Recipe adapted from Super Food Ideas.

Ingredients: (Makes 8 slices)
  • 125g butter, softened
  • 1/2 cup pure icing sugar
  • 1/2 teaspoon vanilla extract
  • 1 1/8 cups plain flour
  • 1/8 cup cornflour
Method:

  1. Preheat oven to 160°C. Using an electric mixer, beat butter, icing sugar and vanilla until pale and creamy.
  2. Sift flour and cornflour over butter mixture. Stir until a soft dough forms. Turn onto a lightly floured surface. Knead dough until smooth. Do not overwork your dough as it will result it a tough instead of crumbly texture.
  3. Wrap dough in a cling wrap and chill in refrigerator for 30 minutes.
  4. Remove dough from fridge and press onto a 9" fluted tart pan. Use the a flat surface of a glass to press and flatten the dough evenly.
  5. Score 8 triangles in each shortbread round (do not cut through dough).
  6. Alternatively, brush the shortbread with eggwhite and sprinkle with sugar.
  7. Bake for 30 to 35 minutes or until shortbread is light golden and firm to the touch.
  8. Use a sharp knife to cut through markings and allow to cool down.
Best enjoyed with a cup of hot chocolate or coffee. ;)

Thursday, August 13, 2009

ABC soup

A healthy, nutritious soup that brings back so much fond memories of childhood. I'm not sure about you but I have this warm fuzzy feeling that reminds me so much of home whenever I drink this soup.


Ingredients: (Serves 5-6)

500g of bones
3 large potatoes, diced*
1 large onion, sliced
2 tomatoes, chopped
4 large carrots, chopped
2.5 litres of water
Salt and pepper, to taste

Method:
  1. Bring a pot of water to boil and put in the bones and allow to boil for 5 minutes.
  2. Pour away this pot of water and give the bones a quick rinse. This step is to remove any scum and is known as par boiling.
  3. Bring the 2.5 litres of water to a boil in a large pot over large fire.
  4. Once the water is boiling, place all the ingredients into the pot.
  5. When the water comes to a boil again, reduce to small fire and let the contents simmer for a few hours.
The soup is ready to be served.

*Use waxy potatoes such as red rascal and kipfler potatoes instead of floury potatoes such as sebago (brushed) and golden delight potatoes. Waxy pototes are high in moisture and low in starch. They’re ideal for salads or stews as they hold their shape well when boiled or steamed while floury potatoes break up during cooking.

Tuesday, August 11, 2009

Kuih Dadar

What better way to use up leftover dessicated coconut than to spoil yourself with luscious pandan pancakes with coconut filling. I have a fetish for pandan and gula melaka.


Recipe adapted from Lily Ng.

Ingredients (Serves 4)

i) Crepe:

1/2 cup of all purpose flour
2 large eggs
1 cup of pandan juice
1 tbsp of melted butter
1 tsp sugar
pinch of salt

ii) Filling:

A:
1 1/2 tbsp sugar
140g grated palm sugar (Gula Melaka)
1 1/2 tbsp water

B:
140g dessicated coconut
1/2 tbsp cornflour mixed with 1 tbsp water

Method:

i) Filling:
  1. Boil A to dissolve sugar. Add coconut, lower heat, stirring till almost dry.
  2. Add the cornflour mixture and cook for 5 minutes. Allow to cool.
ii) Crepe:
  1. Mix the flour, sugar and salt in a large bowl.
  2. Add eggs, melted butter and the pandan juice to the flour mixture and stir.
  3. Strain mixture into a jug to remove any lumps.
  4. On low heat, pour mixture into a non-stick pan and swirl the batter around until a thin layer of pancake is obtained.
  5. Flip the pancake when it is cooked. Do not overcook it as you do not want the pancake to be browned.
  6. Put 2 tbsp of coconut filling and roll like you would the spring roll.


Pardon the horrible wrapping skills as I am still trying to master it. The recipe should provide extra filling but my housemates and I had no problems devouring it. ;)

Sunday, August 9, 2009

Onde-onde

This is an event submission for the Merdeka Open House 2009 held by Babe in the City -KL. The theme for this year is 'My Sweet Malaysia' and selecting a dish to make was particularly difficult as there were so many things I wanted to try out.

I eventually settled with making the good ol' onde-onde that could almost never go wrong. The first time I made onde-onde I was racing against time and resulted in sloppy onde-onde with leaked out palm syrup. Argh!

This time was made with ample amount of time and they turned out perfect.


Looked less green because pandan juice was used instead of pandan paste.


The anticipation.


Palm syrup goodness!

I had a good time licking off palm syrup off the plate. Yum!

Ingredients: (Makes 8)

80g Glutinous Rice Flour
15g Tapioca Flour
Pinch of salt
60ml Pandan Juice
1 tsp Oil
35g Gula Melaka
Dessicated coconut, to coat

Method:
  1. Mix together glutinous rice flour, tapioca flour and pandan juice until combined.
  2. Pinch out a ping pong sized dough, flatten it and place it in boiling water.
  3. When it floats, scoop it out and combine with the rest of the dough.*
  4. Knead the dough until everything is incorporated and a smooth dough is formed. If dough is too dry, add in more juice and if dough is too sticky, add in more glutinous rice flour.
  5. Divide the dough into 8 ping pong sized balls. Flatten each ball and put a teaspoon of gula melaka into the centre.
  6. Enclose the filling and roll it up to form the onde-onde balls.
  7. Drop the onde-onde balls into boiling water. The onde-onde balls floating is an indication that it is cooked. Cook for a further 2 minutes to ensure that the sugar is all dissolved and syrupy.
  8. Remove the ready onde-onde balls and drop them into a bowl of cold water.*
  9. Scoop up the onde-onde balls with a perforated ladle and toss in dessicated coconut to serve.
*This mixture of cooked and raw dough is meant to stabilize the dough. This additional processes will also helps the glutinous rice ball to be more chewier.

We did this twice. Once substituting tapioca flour for corn flour. The one with corn flour resulted in a harder texture while the one with tapioca flour produced a softer, fluffier feel. Now we know, no substitution. ;)

Despite everything that's happening in Malaysia, it will always be the place I call home. Happy 52th, Malaysia!

Friday, August 7, 2009

Ratatouille

Bonjour! Ahhh, inspired by the famous Disney Pixar animation.

How true is that fact that 'Anyone can cook'. I wouldn't have believed it myself if I didn't try my hands out at cooking when I went overseas.

This is an excellent and simple recipe for all vegetable lovers and the health freaks conscious.


Recipe adapted from Delicious.

Ingredients (Serves 4)
  • 3 tomatoes
  • 3 tbs olive oil
  • 1 large onion, chopped
  • 1 red capsicum, diced
  • 1 yellow capsicum, diced
  • 1 eggplant, diced
  • 500g tomato puree
  • 1 tbsp chopped fresh thyme
  • 2 tbs torn fresh basil leaves
  • 2 garlic cloves, crushed
  1. Heat the oil in a frying pan over medium heat and add the onion.
  2. Cook for 2-3 minutes then add the capsicum and cook for a further 5 minutes.
  3. Transfer the onion and capsicum to a plate and set aside.
  4. Add the eggplant to the pan and cook over medium heat for 5-6 minutes.
  5. Return the onion and capsicum to the pan and stir in tomato puree.
  6. Add thyme and tomatoes. Reduce heat to low, cover and cook for 15 minutes, stirring occasionally.
  7. Stir in the basil, thyme and garlic. Season with salt and pepper to taste.
  8. Serve warm either on its own or with roast meat or fish.

Tuesday, August 4, 2009

Carrot cake

What do you do when you bought a kilo of carrots for $0.50 from chinatown? Why, you bake of course!

I remember I said that I will never use the same recipe for carrot cake again as my previous attempt resulted in a dense, heavy, un-carrot-y cake. However, all the reviews received for this cake were positive so I took the chance and made it again.

It turned out well! It was VERY moist (a little too moist perhaps) and smelled very fragrant. Maybe I should cut down the oil next time to reduce moisture. You could see generous amounts of carrots as well. :D

Give it a try and give yourself a Bugs Bunny treat!


Recipe adapted from Fresh Living

Ingredients:

6 small to medium sized carrots, coarsely grated
1 1/2 cup all purpose flour
1 1/2 tsp baking powder
1 tsp bicarbonate soda
1/2 tsp ground cinnamon
1/2 cup brown sugar
1/2 cup oil
1/2 cup maple syrup
1 tsp vanilla extract
3 eggs

Instructions:
  1. Preheat the oven to 170°C and grease a 9 inch round cake pan.
  2. Sift the flour, bicarbonate soda, baking powder and ground cinnamon in a large bowl.
  3. Mix the brown sugar, oil, maple syrup, eggs and vanilla in another bowl until combined.
  4. Add the oil mixture to the dry ingredients and mix until just combined.
  5. Fold in the grated carrots.
  6. Pour the mixture into the pan and bake for 1 hour until a skewer inserted comes out clean.
  7. Set aside for 5 minutes before turning onto a wire rack to cool completely.
You can opt to top it off with cream cheese frosting but the cake alone was good enough for me.
Related Posts with Thumbnails